![]()
![]()
![]()
The following is a brief tutorial on getting the opencv library setup with eclipse CDE on Ubuntu 12. The same eclipse project settings detailed in this tutorial can be re-used to build applicaions on top of opencv.
-
Start by getting things up to date
1
2
sudo apt-get update sudo apt-get upgrade - Install opencv dependencies so we can compile the opencv library
1sudo apt-get install build-essential libgtk2.0-dev libjpeg-dev libtiff4-dev libjasper-dev libopenexr-dev cmake python-dev python-numpy python-tk libtbb-dev libeigen2-dev yasm libfaac-dev libopencore-amrnb-dev libopencore-amrwb-dev libtheora-dev libvorbis-dev libxvidcore-dev libx264-dev libqt4-dev libqt4-opengl-dev sphinx-common texlive-latex-extra libv4l-dev libdc1394-22-dev libavcodec-dev libavformat-dev libswscale-dev - Grab the current stable release of opencv, at the time of this post it was: 2.4.5
1
2
wget https://github.com/Itseez/opencv/archive/2.4.5.tar.gz tar -xvf OpenCV-2.4.5.tar.bz2 - Now we need to build a makefile with cmake if you are just messing around and aren’t sure which modules to install you can run the following command which will include the most common ones including python bindings. Otherwise you can skip to 4a to select which options you want.
If you chose the above generic build options continue to step 5.
1
2
3
4
cmake -D CMAKE_BUILD_TYPE=RELEASE -D CMAKE_INSTALL_PREFIX=/usr/local -D WITH_TBB=ON -D BUILD_NEW_PYTHON_SUPPORT=ON -D WITH_V4L=ON -D INSTALL_C_EXAMPLES=ON -D INSTALL_PYTHON_EXAMPLES=ON -D BUILD_EXAMPLES=ON -D WITH_QT=ON -D WITH_OPENGL=ON ..-
We will use the cmake gui to select which components to include, start by installing it:
1
2
sudo apt-get cmake-qt-gui sudo cmake-gui - A user interface dialog should appear. Select the directory you extraced the opencv source files to for the source directory. Create a new build direcory and select that in the gui as the build destination. Then click the configure button to the lower left, select “unix make files” for a generator, and “use native compilers” option.
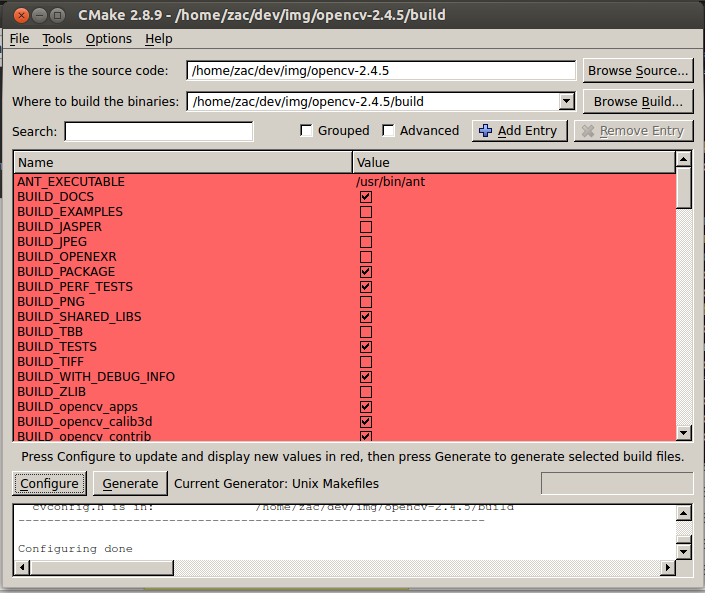
- The configuration process should populate the gui dialog with the available components, tick off desired ones, hover over the right column with the mouse cursor to see a more detailed description.
- Click generate, cmake should populate the build directory with the necessary make files. Check the output window to ensure there were no errors.
-
We will use the cmake gui to select which components to include, start by installing it:
-
Navigate to your build directory in a terminal and make. Then install.
1
2
3
cd release make sudo make install -
To configure the dynamic linker we need to add a line to the end of ld.so.conf.d. The following command will open the file in a text editor (the file may be blank, that is fine).
Add the line:
1sudo gedit /etc/ld.so.conf.d/opencv.confand save it.1/usr/local/lib -
To configure bash.bashrc:
And add:
1sudo gedit /etc/bash.bashrc1 2
PKG_CONFIG_PATH=$PKG_CONFIG_PATH:/usr/local/lib/pkgconfig export PKG_CONFIG_PATH - Logout/restart before moving on to eclipse installation.
-
If you don’t already have eclipse with cde installed do that first with the following command
1sudo apt-get install eclipse eclipse-cdt g++ -
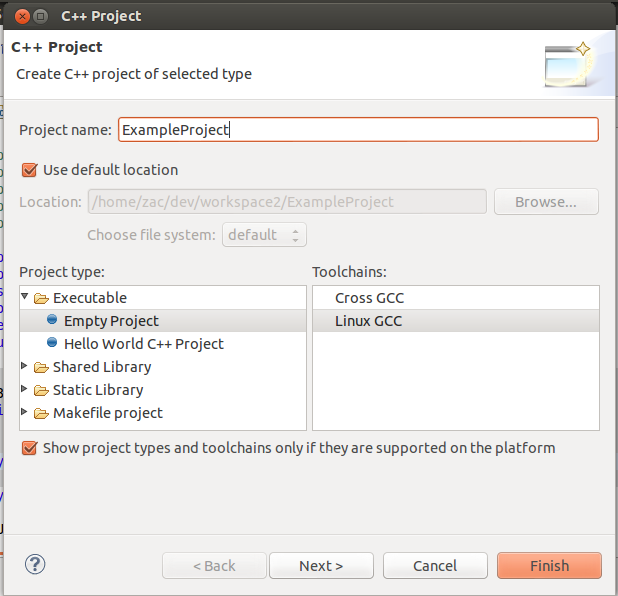
Open eclipse and create a new empty c++ project using the linux GCC toolchain
- Next we need to add some code to the project so we have something to build/run. I am goint to take the bag of words example out of the /samples/cpp/ directory of the opencv project. Simple copy/paste the file into your new project.
-
Next we need to tell eclipse what libraries to include with the project and where to find them. Goto project -> properties on the file menu or just right click on the project in the projects pane and click on properties. A dialog should appear, click on C/C++ Build -> settings then click on includes.
Add the following to the include paths list Noted: if you need to compile projects with the older c++ api, you would replace opencv2 with opencv
Next goto the GC++ Linker tab and add the following to the library search paths list:
1/usr/local/include/opencv2then add the following libs to the libary list1/usr/local/libfor other projects you can remove uneceoctopress spell checkingssary libs or add dependent other dependant ones.1 2 3 4 5 6 7 8 9 10 11 12
opencv_core opencv_nonfree opencv_imgproc opencv_highgui opencv_ml opencv_video opencv_features2d opencv_calib3d opencv_objdetect opencv_contrib opencv_legacy opencv_flann -
These project settings should now allow you to compile projects referencing opencv. Goto project -> build the project should build. Then run it, if you are using the bag of words example from the samples folder you should see console output similar to the following:
Tip: the bag of words example references each module individually, if you want to quickly reference all the free modules for tesing just include
1 2 3 4 5 6 7 8 9 10 11 12 13 14 15 16 17 18 19 20 21 22
This program shows how to read in, train on and produce test results for the PASCAL VOC (Visual Object Challenge) data. It shows how to use detectors, descriptors and recognition methods Using OpenCV version %s 2.4.5 Call: Format: .//home/zac/dev/workspace2/Test2/Debug/Test2 [VOC path] [result directory] or: .//home/zac/dev/workspace2/Test2/Debug/Test2 [VOC path] [result directory] [feature detector] [descriptor extractor] [descriptor matcher] Input parameters: [VOC path] Path to Pascal VOC data (e.g. /home/my/VOCdevkit/VOC2010). Note: VOC2007-VOC2010 are supported. [result directory] Path to result diractory. Following folders will be created in [result directory]: bowImageDescriptors - to store image descriptors, svms - to store trained svms, plots - to store files for plots creating. [feature detector] Feature detector name (e.g. SURF, FAST...) - see createFeatureDetector() function in detectors.cpp Currently 12/2010, this is FAST, STAR, SIFT, SURF, MSER, GFTT, HARRIS [descriptor extractor] Descriptor extractor name (e.g. SURF, SIFT) - see createDescriptorExtractor() function in descriptors.cpp Currently 12/2010, this is SURF, OpponentSIFT, SIFT, OpponentSURF, BRIEF [descriptor matcher] Descriptor matcher name (e.g. BruteForce) - see createDescriptorMatcher() function in matchers.cpp Currently 12/2010, this is BruteForce, BruteForce-L1, FlannBased, BruteForce-Hamming, BruteForce-HammingLUT1#include "opencv.hpp"
References:
http://docs.opencv.org/doc/tutorials/introduction/linux_eclipse/linux_eclipse.html
http://www.samontab.com/web/2012/06/installing-opencv-2-4-1-ubuntu-12-04-lts/